
Esta es una lista de problemas que he encontrado en SWP 5.x y que he resuelto. En el blog existen otras entradas para otros problemas que he resuelto.
______________________________________________________________________________
Insertar figuras en pdf
Inserte un encapsulado y coloque allí\begin{figure}[H]%%Usando el paquete float
\centering
\includegraphics[scale=0.5]{C:/ebookF/SolenoideCorelX5.pdf}
\caption{Imagen en pdf}
\label{imagen en pdf}
\end{figure}
ó
\begin{center}
\includegraphics[width=.7\textwidth]{D:/LaTeX/TuePDFScreen/plot3.pdf}\\
\figcaption{pdf de inkscape}\label{ink}
\end{center}
_________________________________________________________________________________
Para añadir una sección no numerada al TOC
Para justificar texto a la derecha
Para insertar imagen en la portada del tipo BOOK
Para que la bibliografía aparezca en el índice
Conseguir separación de palabras en español
Especificar márgenes del documento
Poner etiquetas de definición y ejemplo en español usando contadores independientes
Poner figuras flotantes
Especificar interlineado
Especificar separación entre columnas
Trabajar con distinto número de columnas en un mismo documento
Referencias en otro formato sin usar Bibtex
Cambiar el interlineado de un párrafo (distinto al del estilo)
Poner un comentario a pie de Tabla y que salga en el índice correspondiente
para permitir construcciones como
máx ai.
i∈I
y cambiar el parámetro h por H (mayuscula)
Ejemplo:
y se posicionara donde tu pusiste la imagen y no donde a LaTeX se le antoje.
Para que ponga "Referencias" en lugar de "Bibliografía"
Esta línea es para cuando sea una sección y que ponga "Referencias" en
vez de Bibliografía.
\renewcommand{\refname}{Referencia} ---> Para article
\renewcommand{\bibname}{Bibliografía} ---> Para book
Para añadir una sección no numerada al TOC
Para que ponga "Referencias" en lugar de "Bibliografía"
Esta línea es para cuando sea una sección y que ponga "Referencias" en
vez de Bibliografía.
vez de Bibliografía.
\renewcommand{\refname}{Referencia} ---> Para article
\renewcommand{\bibname}{Bibliografía} ---> Para book
\addcontentsline{toc}{nombre}
Para justificar texto a la derecha
INSERT, SPACING, HORIZONTAL-SPACE, CUSTOM, STRETCHY
Para insertar imagen en la portada del tipo BOOK
Hacer un Edición, Paste Special, y luego en la Figura configurarla a INLINE. Si no está
centrada se les puede añadir espacio virtual en la parte derecha (o izquierda, dependiendo de hacia donde se quiera mover)
indicando en PICTURES-PROPERTIES de la Figura en Right un valor negativo
(por ejemplo -26 la desplaza unos 3 centímetros a la izquierda).
centrada se les puede añadir espacio virtual en la parte derecha (o izquierda, dependiendo de hacia donde se quiera mover)
indicando en PICTURES-PROPERTIES de la Figura en Right un valor negativo
(por ejemplo -26 la desplaza unos 3 centímetros a la izquierda).
Para que la bibliografía aparezca en el índice
Añadir un campo TeX encapsulado con el contenido siguiente en el documento maestro:
\addcontentsline{toc}{chapter}{\bibname}
la ubicación exacta es en la primera referencia bibliográfica justo a la
izquierda del nombre del primer autor. Si se pone en la línea anterior
el contador de número de página no es el correcto.
izquierda del nombre del primer autor. Si se pone en la línea anterior
el contador de número de página no es el correcto.
Conseguir separación de palabras en español
1. Menú Insert
2. Spacing
3. Break
4. En la ventana que sale escoger discretionary hyphen
2. Spacing
3. Break
4. En la ventana que sale escoger discretionary hyphen
Otra forma foram es colocar en el preámbulo la instrucción \hypenation{pa-la-bra se-pa-ra-da}. Las palabra se separan con espacios en blanco. Desafortunadamente \hypenation{...} no admite símbolos con acentos como \'a o í (ni aún con el paquete inputenc). En tales o usamps OT1 con particionamos manualmente.
Especificar márgenes del documento
1. Añadir el paquete geometry
Ir a Typeset | Options and Packages
Seleccionar Packages Options
Presionar Add
Seleccionar geometry
Salir
2. Definir márgenes
Ir a Typeset | Preamble
Añadir una línea como la siguiente, en la cual se fijan los márgenes a ciertas cantidades
Ir a Typeset | Preamble
Añadir una línea como la siguiente, en la cual se fijan los márgenes a ciertas cantidades
\geometry{tmargin=3.5cm, lmargin=2.5cm, rmargin=2.5cm, bmargin=2.5cm, noheadfoot}
noheadfoot indica que no se deja espacio adicional para la cabecera y el pie de la página.
Poner etiquetas de definición y ejemplo en español usando contadores independientes
Ir a Typeset | Preamble
Añadir las siguientes líneas (sobreescribiendo las dos últimas si ya existen).
Añadir las siguientes líneas (sobreescribiendo las dos últimas si ya existen).
\newtheorem{definicion}{Definición}
\newtheorem{ejemplo}{Ejemplo}
\newtheorem{definition}[definicion]{Definición}
\newtheorem{example}[ejemplo]{Ejemplo}
\newtheorem{ejemplo}{Ejemplo}
\newtheorem{definition}[definicion]{Definición}
\newtheorem{example}[ejemplo]{Ejemplo}
Poner figuras flotantes
Copiar estos dos ficheros ( efmar.sty y eftci.sty ) en el directorio que crees llamado c:\SW5.x\TCITex\TeX\Latex\personal
1. En Preamble al final incluir lo siguiente:
\RequirePackage[nolists]{endfloat}
\RequirePackage{eftci}
\RequirePackage{efmar}
\RequirePackage[nolists]{endfloat}
\RequirePackage{eftci}
\RequirePackage{efmar}
Los dos primeros son obligatorios. Se puede quitar [nolists] y sacará una lista al final de la figuras. (hay más opciones que se pueden mirar en el help de endfloat).
El último es opcional y permite que el texto indicador de dónde iría la figura lo coloque fuera de los márgenes del texto. Caso de quitarlo el texto "Figure 1 over here" aparecerá en el documento mismo.
2. Insertar un text field con el contenido:
\begin{figure}[tbp] \centering
\begin{figure}[tbp] \centering
lo de \centering se puede quitar
3. Insertar una tabla de 1x1.
4. Colocar el cursor dentro de la tabla y hacer FILE-Import Picture. Importamos así la figura.
5. En las opciones de la Figura, indicar flotamiento INLINE. NADA MÁS.
6. Incluir un text field justo a la derecha de la figura con el contenido:
\caption{Ejemplo de jerarquía.\label{Dibujo1}}
\caption{Ejemplo de jerarquía.\label{Dibujo1}}
donde se indica el texto del caption y la clave de referencia de la figura.
7. Insertar un text field con el contenido:
\end{figure}
\end{figure}
Especificar interlineado
Ir a Typeset | Preamble
Añadir la siguiente línea (por ejemplo para interlineado 1.5)
Añadir la siguiente línea (por ejemplo para interlineado 1.5)
\renewcommand{\baselinestretch}{1.5}
Especificar separación entre columnas
Ir a Typeset | Preamble
Añadir la siguiente línea (por ejemplo para separación 0.6cm)
Añadir la siguiente línea (por ejemplo para separación 0.6cm)
\setlength{\columnsep}{0.6cm}
Trabajar con distinto número de columnas en un mismo documento
1. Añadir el paquete multicol
Ir a Typeset | Options and Packages
Seleccionar Packages Options
Presionar Add
Seleccionar multicol
Salir
Ir a Typeset | Options and Packages
Seleccionar Packages Options
Presionar Add
Seleccionar multicol
Salir
2. Indicar en el documento el inicio/término de un bloque con múltiples columnas.
Por ejemplo para una sección de tres columnas:
Por ejemplo para una sección de tres columnas:
\begin{multicols}{3}
....texto LaTeX
\end{multicols}
....texto LaTeX
\end{multicols}
Nota: Las figuras deben ajustarse floating y Top of page, haciendo un PageBreak justo antes
de la página donde aparecerán.
de la página donde aparecerán.
Referencias en otro formato sin usar Bibtex
Por ejemplo para obtener [Sánchez99]
En Bibliografy Item Properties poner Key =Sanchez99(sin acento) y Label =Sánchez99
Cuando se hace referencia, con CITE, poner key =Sanchez99
En Bibliografy Item Properties poner Key =Sanchez99(sin acento) y Label =Sánchez99
Cuando se hace referencia, con CITE, poner key =Sanchez99
De todas formas lo más recomendable es usar Bibtex
Cambiar el interlineado de un párrafo (distinto al del estilo)
Opción 1:
\begin {spacing}{3}
.....texto ......
\end{spacing}
(para pasar a interlineado 3)
\begin {spacing}{3}
.....texto ......
\end{spacing}
(para pasar a interlineado 3)
Esta opción ,si el texto es una sección, por ejmplo Bibliografía, creo que no funciona,
en este se sugiere la opción
en este se sugiere la opción
Opción 2:
\renewcommand{\baselinestretch}{1} \small ....texto ....\end
(En esta opción se cambia también de tipo de letra,
si no se quiere hacer este cambio, se le puede engañar haciendo
dos cambios sucesivos: \small \Normalfont , por ejemplo.
\renewcommand{\baselinestretch}{1} \small ....texto ....\end
(En esta opción se cambia también de tipo de letra,
si no se quiere hacer este cambio, se le puede engañar haciendo
dos cambios sucesivos: \small \Normalfont , por ejemplo.
Poner un comentario a pie de Tabla y que salga en el índice correspondiente
Deberemos utilizar una tabla de tipo flotante, en el menu de los fragnments aparece como table4x3, floating;
Podemos cambiar donde estará situada [h]:here, [t]:top, [b]¨:botton, el título , la etiqueta ...
Podemos cambiar donde estará situada [h]:here, [t]:top, [b]¨:botton, el título , la etiqueta ...
\begin{table}[h]
\centering
LA_TABLA
\caption{título asociado
\label{Tabla}}
\end{table}
También sirve para figuras flotantes sobre todo si se carga el paquete float.
Insertar figuras en formato pdf
Crear un encapsulado y colocar allí el siguiente código habiendo previamente cargado el paquete graphicx
\begin{figure}[hbtp]
\centering
\includegraphics[scale=0.5]{C:/folder/archivo.pdf}
\caption{xcvxcv}
\label{xzcvxcv}
\end{figure}
La ruta no debe tener espacios.
LaTeX: Cancelar/tachar términos en una fórmula
Para cancelar (o tachar) términos en una fórmula de LaTeX se usa el paquete
\usepackage{cancel}
que tiene los siguientes comandos
\cancel{}
\cancelto{}{}
\xcancel{}
\bcancel{}
\cancelto{}{}
\xcancel{}
\bcancel{}
Definición de operadores y relaciones en LaTeX
Si vamos a usar con frecuencia una función o relación no estándar conviene definirla en el preambulo indicando su categoría para garantizar el espaciado correcto. Por ejemplo, para definir una función sen (en lugar de sin, que daLaTeX por defecto) deberemos poner en el preámbulo
\def\sen{\mathop{\mbox{\normalfont sen}}\nolimits}
Ponemos \nolimits para evitar que al escribir \sen^2 x obtengamos
2
sen x,
es decir, con el 2 encima de la palabra sen, en lugar de como un superindice.
2
sen x,
es decir, con el 2 encima de la palabra sen, en lugar de como un superindice.
En cambio, si queremos definir un operador máx (con acento) deberemos poner
\def\max{\mathop{\mbox{\normalfont m\’ax}}\limits}
para permitir construcciones como
máx ai.
i∈I
En general, los comandos para especificar la categoría de un símbolo son\mathbin (operador binario), \mathop (operador), \mathrel (relación), \mathord(ordinario), \mathnormal (normal). Es raro que necesitemos definir un delimitador, un acento o un signo de puntuación.
LaTeX: Texto reflejado
Este es un efecto que se le puede poner al texto de manera que se vea como visto desde un espejo. Hay que usar \reflectbox{texto} del paquete graphics y el texto aparecera reflejado horizontalmente
reflectbox tambien se usa con gráficos:
\reflectbox{\includegraphics{myimage.png}}
Nota: recuerda incluir en el preambulo de tu documento
\usepackage{graphics}
reflectbox tambien se usa con gráficos:
\reflectbox{\includegraphics{myimage.png}}
Nota: recuerda incluir en el preambulo de tu documento
\usepackage{graphics}
LaTeX: Colocar las imágenes donde queremos
Para colocar una imagen exactamente en una posición debes poner en el preambulo de tu documento al paquete float
| \usepackage{float} |
y cambiar el parámetro h por H (mayuscula)
Ejemplo:
| \begin{figure}[H] \begin{center} \includegraphics[height=2.0in,width=2.0in]{image1.eps} \caption{Figura 1} \label{fig:figura1} \end{center} \end{figure} |
y se posicionara donde tu pusiste la imagen y no donde a LaTeX se le antoje.
Nota: También podrias usar \clearpage despues de cada imagen. El problema es que al usar este comando, se procesan (se colocan en el docuemnto) todas las imágenes que aún no se han procesado.
LaTeX: Incluir capítulos/secciones no numerados en el índice
Para incluir capítulos o secciones no numerados en el índice se puede usar
\chapter*{Nombre del capítulo}
o
\section*{Nombre de la sección}
se obtienen capítulos o secciones sin numeración, y no son incluidos en el índice.
Para que aparezcan el el índice hay que usar
Para que aparezcan el el índice hay que usar
\chapter*{Nombre del capítulo}
\addcontentsline{toc}{chapter}{Nombre del capítulo}
\addcontentsline{toc}{chapter}{Nombre del capítulo}
y
\section*{Nombre de la sección}
\addcontentsline{toc}{chapter}{Nombre de la sección}
\addcontentsline{toc}{chapter}{Nombre de la sección}
LaTeX: Insertar logo en Beamer
Para insertar un logo en beamer (sin usar la técnica de marca de agua en beamer) se usan los siguientes comandos:
\pgfdeclareimage[heigth=0.9cm]{latex-logo}{imagen1}
\logo{\pgfuseimage{latex-logo}}
\logo{\pgfuseimage{latex-logo}}
Donde imagen1 es la imagen que queremos agregar como logo en nuestrapresentación de beamer (con formato ps, por ejemplo). latex-logo es simplemente un nombre que le asignamos a esa imagen.
Insertar dos logos en beamer (uno a cada lado)
De manera similar, si queremos un logo a cada lado de la diapositiva, usamos los mismos comandos (con un código extra para el logo del lado izquierdo)
\pgfdeclareimage[height=0.9cm]{left-logo}{imagen1}
\pgfdeclareimage[height=0.9cm]{right-logo}{imagen2}
\logo{\pgfuseimage{right-logo}}
\pgfdeclareimage[height=0.9cm]{left-logo}{imagen1}
\pgfdeclareimage[height=0.9cm]{right-logo}{imagen2}
\logo{\pgfuseimage{right-logo}}
\setbeamertemplate{sidebar left}
{
\logo{\pgfuseimage{left-logo}}
\vfill%
\rlap{\hskip0.1cm\insertlogo}%
\vskip15pt%
}
donde image1 e imagen2 son las imágenes que vamos a usar para los logos (en formato ps, por ejemplo).
{
\logo{\pgfuseimage{left-logo}}
\vfill%
\rlap{\hskip0.1cm\insertlogo}%
\vskip15pt%
}
donde image1 e imagen2 son las imágenes que vamos a usar para los logos (en formato ps, por ejemplo).
LaTeX: marca de agua en Beamer
Para insertar una imagen en forma de marca de agua (watermark) en unapresentación echa en Beamer se usa el siguiente comando:
\usebackgroundtemplate{\includegraphics[width=\paperwidth]{IMAGE}}
donde IMAGE es el nombre del archivo de una imagen que se va a usar de fondo (con todo y la extensión).
Ese comando se coloca en el preambulo del documento TeX (antes de\begin{document}).
\usebackgroundtemplate{\includegraphics[width=\paperwidth]{IMAGE}}
donde IMAGE es el nombre del archivo de una imagen que se va a usar de fondo (con todo y la extensión).
Ese comando se coloca en el preambulo del documento TeX (antes de\begin{document}).
El comando inserta la imagen en el fondo de todas las diapositivas. Se recomienda que la imagen sea de colores claros, para que no interfiera con el texto.
LaTeX: paquete multicols
El paquete multicols define un emabiente para poder trabajar con varias columnas en tu documento LaTeX, y cambiar de número de columnas de manera sencilla.
El uso es el siguiente:
\begin{multicols}{n}
texto
\end{multicols}
donde n es el n[umero de columnas (1,2,3 hasta 10 columnas) y texto es el texto que se va a dividir en columnas.
El paquete lo descargas de aca:
LaTeX: paquete listings
Cuando insertamos código de algun lenguaje (como C++) en LaTeX usando elpaquete listings, algunas veces en los comentarios aparecen letras acentuadas y no aparecen o aparecen en el lugar incorrecto dentro del código. Para resolver este inconveniente podemos usar el siguiente truco:
- Activamos la opción mathescape=true
- Dentro del comentario ponemos los símbolos $$ para introducir códigoLaTeX.Usamos \textrm{} para introducir texto.
Ejemplo:
\begin{lstlisting}[language=C,mathescape=true]
void int main()
{
/*$\textrm{\’{e}ste es un comentario con acentos: par\’{a}metro y con s\’{i}mbolos matem\’{a}ticos:}\lambda$*/
}
void int main()
{
/*$\textrm{\’{e}ste es un comentario con acentos: par\’{a}metro y con s\’{i}mbolos matem\’{a}ticos:}\lambda$*/
}
Como ven, este mismo truco nos sirve para poner símbolos matemáticos dentro de los comentarios (como el símbolo \lambda), lo mismo que ecuaciones.
Imágenes dentro del código
Con este mismo truco podemos insertar figuras dentro del código fuente:
\begin{lstlisting}[mathescape=true]
/*
$ \includegraphics[height=1cm]{defs-p1.eps} $
*/
typedef struct {
Atom_T *V_ptr; /* pointer to Vacancy in grid */
Atom_T *x_ptr; /* pointer to (A|B) Atom in grid */
} ABV_Pair_T;
\end{lstlisting}
/*
$ \includegraphics[height=1cm]{defs-p1.eps} $
*/
typedef struct {
Atom_T *V_ptr; /* pointer to Vacancy in grid */
Atom_T *x_ptr; /* pointer to (A|B) Atom in grid */
} ABV_Pair_T;
\end{lstlisting}
Fuente: página 54 de http://tezcatl.fciencias.unam.mx/tex-archive/macros/latex/contrib/listings/listings.pdf
\caption en figuuras y tablas
Al usar el comando \caption{Título de la figura o tabla} dentro de los entornos figure o table (los que se usan para generar entornos flotantes en el documento), se producen por defecto las líneas:
Figura 8: Título de la figura o tabla.
Cuadro 6: Título de la figura o tabla.
Por ejemplo, si han usado el \usepackage[spanish]{babel}.
¿Es posible cambiar "Figura" y "Cuadro" por otras palabras?
¿Es posible cambiar la numeración simple 1,2,3,4, etc. dada por defecto?
La respuesta es SI.
Cuando se necesita hacer un documento extenso, con muchas secciones es preferible numerar las figuras (o tablas) de acuerdo a la sección donde se encuentra dicha figura o tabla. Por ejemplo, tener una numeración de la forma "Figura X.Y" donde X es la sección actual e Y corresponde a la posición de la figura en la sección X.
Además, es posible cambiar las palabras Figura por Fig. y Cuadro por Tabla en los \caption.
Sólo se necesita declarar algunos comandos.
Primero, en el preámbulo se necesita \usepackage{amsmath}
Luego, después de \begin{document} deben poner:
\renewcommand{\figurename}{Fig.} %Cambia la palabra "Figura" por "Fig."
\renewcommand{\tablename}{Tabla} %Cambia la palabra "Cuadro" por "Tabla"
\renewcommand\thefigure{\arabic{section}.\arabic{figure}} % Genera numeración X.Y
\renewcommand\thetable{\arabic{section}.\arabic{table}} % Genera numeración X.Y
\numberwithin{figure}{section} %Hace que la primera figura de cada sección X sea X.1
\numberwithin{table}{section} %Hace que la primera tabla de cada sección X sea X.1
LaTeX: Modificar dos puntos (:) en el pie de figura (caption)
Para modificar dos puntos (: ) en el pie de figura (caption) y poner en su lugarun punto, es decir, que salga Figura 3.1. Titulo de la figura en lugar deFigura 3.1: Titulo de la figura
poner esto en el preambulo del documento (antes de \begin{document})
poner esto en el preambulo del documento (antes de \begin{document})
| Código: |
| \makeatletter \long\def\@makecaption#1#2{% \vskip\abovecaptionskip \sbox\@tempboxa{#1. #2}% \ifdim \wd\@tempboxa >\hsize #1. #2\par \else \global \@minipagefalse \hb@xt@\hsize{\hfil\box\@tempboxa\hfil}% \fi \vskip\belowcaptionskip} \makeatother ___________________________________________________________________________________________________ How to add and remove LaTeX packages
Version: 3.x, 4.x, 5.x - Scientific WorkPlace & Scientific Word
The packages used by SWP and SW document shells have been carefully chosen to achieve certain typesetting results. However, you may decide to add a package to your document or to remove a package that you don't need.
If you add packages, you may also be able to add package options and arguments for the packages you specify. On occasion, you may want to use a package that isn't part of your program installation. In that case, you must add it to the installation before you can add it to your document.
Note Unless you're very familiar with LaTeX and LaTeX packages, we urge you not to remove packages specified by the document shell.
From the Package Options tab, you can see the list of packages in effect and those that are available to be added to your document. Note that the list of available packages differs for different versions of the program. Remember that the order in which you specify packages can affect LaTeX behavior.
By default, the program automatically manages LaTeX packages, adding certain packages such as amsmath to most SWP and SW documents. If you have Version 5, you can manage packages yourself and prevent the program from adding packages automatically.
Adding a package to your document
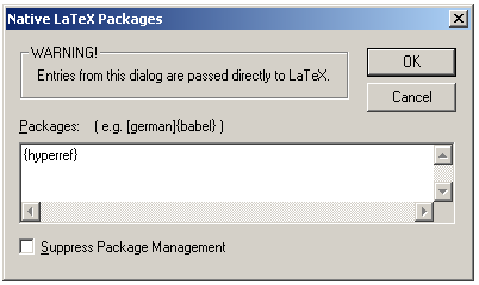
Going native
If the package you want isn't listed as available in your version of SWP or SW, you can go native to add the LaTeX commands that force the program to use the package. When you typeset your document, the program passes the typesetting information directly to LaTeX for processing. If the commands are in error, LaTeX won't be able to typeset your document or to create a DVI file. Further, incorrect syntax can damage your document beyond repair.
Note Be careful to enter commands correctly. Incorrect syntax can cause LaTeX to fail and may damage your document permanently.
You can add package options and arguments for the packages you specify.
Removing a package from your document
Suppressing program management of LaTeX packages
|
 or, from the
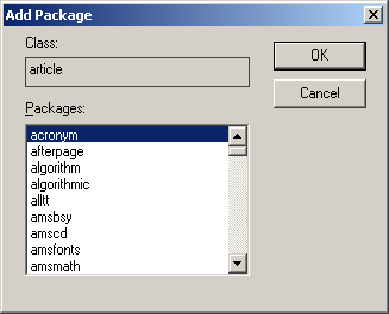
___________________________________________________________________________________________________________
:
Creating independent numbering of theorem environments
Version: 3.x, 4.x, 5.x - Scientific WorkPlace & Scientific Word
In many documents, all of the theorem-like environments use a common numbering scheme and are typeset in a single sequence, as in this series:
Theorem 1, Corollary 2, Lemma 3, Theorem 4, Lemma 5, etc.
If you're familiar with TeX and LaTeX and the \newtheorem statements that determine the numbering scheme and appear in the document preamble, you can create an independent numbering sequence for each type of theorem-like environment, as in this series:
Theorem 1, Corollary 1, Lemma 1, Theorem 2, Lemma 2, etc.
- From the Typeset menu, choose Preamble.
- Find the \newtheorem statement for the environment whose numbering you want to change.The statements usually have this form:\newtheorem{counter}[counter_basis]{counter_title}.
- Remove the [counter_basis] argument from the command.
- Choose OK.
Sometimes the \newtheorem statements are included in the typesetting specifications for the shell. In that case, don't attempt to modify the statements. Instead, choose a different shell in which theorem statements are numbered to your liking.
___________________________________________________________________________________________
Resetting theorem numbering for new divisions
Version: 3.x, 4.x, 5.x - Scientific WorkPlace & Scientific Word
You can reset the numbering of theorem-like environments to 1 for each new document division instead of having numbering run consecutively throughout your document. The division number is then included in the numbering scheme for the theorem-like environments.
If you're familiar with LaTeX and the \newtheorem statements that determine the numbering scheme and appear in the preamble of your document, you can provide independent instead of common numbering for theorem-like environments using an alternate form of the statements:
\newtheorem{counter}{counter_title}[numbered_within]
The numbered_within parameter, which is the name of an already defined division counter, determines when the counter is reset to 1.
NoteMake a backup copy of your document before you make any modifications to the preamble.
- From the Typeset menu, choose Preamble.
- Scroll through the commands to find the \newtheorem statement for the environment whose numbering you want to reset.The statements usually have the form: \newtheorem{counter}[counter_basis]{Counter_title}.
- Remove the [counter_basis] argument from the middle of the command if it exists.
- Add the [numbered_within]
- Choose OK.
Examples
The numbering of theorem-like environments in the Standard LaTeX Article shell is controlled by these \newtheorem statements in the document preamble:
\newtheorem{theorem}{Theorem}
\newtheorem{acknowledgement}[theorem]{Acknowledgement}
\newtheorem{algorithm}[theorem]{Algorithm}
\newtheorem{axiom}[theorem]{Axiom}
\newtheorem{case}[theorem]{Case}
\newtheorem{claim}[theorem]{Claim}
\newtheorem{conclusion}[theorem]{Conclusion}
\newtheorem{condition}[theorem]{Condition}
\newtheorem{conjecture}[theorem]{Conjecture}
\newtheorem{corollary}[theorem]{Corollary}
\newtheorem{criterion}[theorem]{Criterion}
\newtheorem{definition}[theorem]{Definition}
\newtheorem{example}[theorem]{Example}
\newtheorem{exercise}[theorem]{Exercise}
\newtheorem{lemma}[theorem]{Lemma}
\newtheorem{notation}[theorem]{Notation}
\newtheorem{problem}[theorem]{Problem}
\newtheorem{proposition}[theorem]{Proposition}
\newtheorem{remark}[theorem]{Remark}
\newtheorem{solution}[theorem]{Solution}
\newtheorem{summary}[theorem]{Summary}
These statements specify the theorem environment, and then specify that all other theorem-like environments are numbered according to how the theorem environment is numbered. This gives numbering like Theorem 1, Lemma 2, Corollary 3, Theorem 4, Lemma 5, etc.
If you want to keep this style of numbering, but include the section number, then the only change needed is to the \newtheorem statement for the theorem environment. Changing the command for the theorem environment to:
\newtheorem{theorem}{Theorem}[section]
will result in numbering like Theorem 2.1, Lemma 2.2, Corollary 2.3, Theorem 2.4, Lemma 2.5, etc. where the "2." is the section number. The right side of the numbering will reset to one at the beginning of each section.
If you want independent numbering of each theorem like environment, but still numbering within each section, then you would add [section] to the end of each \newtheoremstatement, removing [theorem]. That is, you would use the following in the document preamble:
\newtheorem{theorem}{Theorem}[section]
\newtheorem{acknowledgement}{Acknowledgement}[section]
\newtheorem{algorithm}{Algorithm}[section]
\newtheorem{axiom}{Axiom}[section]
\newtheorem{case}{Case}[section]
\newtheorem{claim}{Claim}[section]
\newtheorem{conclusion}{Conclusion}[section]
\newtheorem{condition}{Condition}[section]
\newtheorem{conjecture}{Conjecture}[section]
\newtheorem{corollary}{Corollary}[section]
\newtheorem{criterion}{Criterion}[section]
\newtheorem{definition}{Definition}[section]
\newtheorem{example}{Example}[section]
\newtheorem{exercise}{Exercise}[section]
\newtheorem{lemma}{Lemma}[section]
\newtheorem{notation}{Notation}[section]
\newtheorem{problem}{Problem}[section]
\newtheorem{proposition}{Proposition}[section]
\newtheorem{remark}{Remark}[section]
\newtheorem{solution}{Solution}[section]
\newtheorem{summary}{Summary}[section]
This will result in numbering like Theorem 2.1, Lemma 2.1, Corollary 2.1, Theorem 2.2, Lemma 2.2, etc. where the "2." is the section number.
These examples are appropriate for most article style typesetting specifications where section is the highest division level. If using a book or report typesetting specification, chapter is the highest division level. Just substitute section with chapter in the above if you want to make the same type of changes to a document using a book or report typesetting specification.
____________________________________________________________________________________________
Modifying the program interface for added LaTeX packages
Version: 5.x - Scientific WorkPlace & Scientific Word
To simplify the use of a package that isn't provided with SWP or SW, you can modify the program interface so the package and its options are available from the Options and Packages dialog box. The modification is optional. If you don't modify the interface, you can go native to specify package options.
Modifying the interface for an added package involves adding information to two files (classes.pkg and packgs.opt) in the Typeset directory of your program installation. The fileclasses.pkg contains a section for each available document class listing packages that are available to be added to documents of that class. A typical listing begins like this:
[article]
acronym
afterpage
algorithm
algorithmic
allttamscd:
The packgs.opt file lists the options available for each file in the program installation, as shown in this example for the titletoc package:
[titletoc]
1=Label alignment
1.1=Left-default,leftlabels
1.2=Right,rightlabels
2=Dot after label
2.1=No - default,nodotinlabels
2.2=Yes,dotinlabels
1=Label alignment
1.1=Left-default,leftlabels
1.2=Right,rightlabels
2=Dot after label
2.1=No - default,nodotinlabels
2.2=Yes,dotinlabels
The first-level numbers indicate the option category. The second-level numbers indicate the option as it appears in the Options for package dialog box, followed by a comma and the name of the option as defined in the package itself. Read the package documentation to determine the available options for new packages, then modify the interface to include the new package:
- Modify the classes.pkg file:
- Using an ASCII editor, open the classes.pkg file in the Typeset directory of your program installation.
- For each document class, add a new line and enter the package name.
- Save and close the file.
The package name will appear in the list of available packages the next time you open the Options and Packages dialog box. - Modify the packgs.opt file:
- Using an ASCII editor, open the packgs.opt file in the Typeset directory of your program installation.
- On a new line, enter the package name in square brackets and press Enter.
- For each option category, type a first-level entry in the form x=categoryname, where x is the number of the category and categoryname is the category name as you want it to appear in the Options for package dialog box.
- For each option category, type a series of second-level entries in the form x.y=optionname, option where x is the number of the category, y is the number of the option within the category, optionname is the description of the option as you want it to appear in the Options for package dialog box, and option is the name of the option as it is defined in the package.
- Save and close the file.
The next time you open the Options and Packages dialog box, the categories and their corresponding options will appear in the Options for package dialog b
------------------------------------------------------------------------------------------------------------------------------------------------------------------------------------------------------------------
Adding LaTeX packages to the program installation
Version: 5.5 - Scientific WorkPlace & Scientific Word
You can use a package that isn't provided with SWP or SW:
- Obtain the package from a source such as the Comprehensive TeX Archive Network (CTAN).
- Add the package to your program installation in the TCITeX/TeX directory or one of its subdirectories.You may want to create a new subdirectory for packages that aren't part of the original program installation.
- Modify the program interface so that the package and its options are available via the Options and Packages dialog box.
Modifying the interface is optional, but simplifies working with the added package. Alternatively, you can go native to specify package options.
___________________________________________________________________________________________
How to change automatic division numbering
Version: 3.x, 4.x, 5.x - Scientific WorkPlace & Scientific Word
You can begin division numbering in your document with a number other than 1 by adding a command to the document preamble:.
- From the Typeset menu, choose Preamble and click the mouse in the entry area.
- On a new line at the end of the preamble entries, type \setcounter{name}{x} where nameis the division for which you want to modify the numbering, as shown in the following table, and x is a number one less than the starting number you want.
.Division name Part part Chapter chapter Section section Subsection subsection Subsubsection subsubsection Subsubsubsection paragraph Subsubsubsubsection subparagraph - Choose OK. is first used by the document.The command increments the section counter before it is first used by the document.
As an illustration, if you want the first section in the document to carry the number 2, use the command
\setcounter{section}{1}
in the preamble.
\setcounter{section}{1}
in the preamble.